Introduction
Photographers have been trying to modify the contrast of single graded papers with varying degrees of success since before the turn of the century. Although negatives often require paper contrast in–between normal grades, to date the methods devised for acquiring such contrast control over single graded papers have been of limited value. The obvious answer to this dilemma is to use variable contrast papers. However, many photographers do not like such papers for one reason or another, and the selection of VC papers is nowhere near as varied as that of conventional graded papers.
The most widely used approach to modifying graded paper contrast has been the Dr. Beers formula(s) or a variation thereof. Unfortunately, this technique generally provides only (approximately) ±2 grade variation. In addition, the Dr. Beers approach is tedious and often wastes large amounts of what is no longer inexpensive chemistry. Having used a variation of the Beers technique for several years, I am painfully aware of its shortcomings. In this article, it is my intention to provide a simpler, more economical, and far more versatile alternative to the older techniques.
Background
In "Zone System Contraction - Part III," I describe my group of techniques known collectively as Selective Latent Image Manipulation Techniques (SLIMT). In addition to techniques for reducing film contrast for both B&W and color, getting medium contrast from high contrast films, reducing film speed, and for controlling contrast of color papers, I also discuss using SLIMT’s to reduce B&W paper contrast. This latter technique is also know as the “New Sterry Method.” For those readers who do not have that article and/or have never heard of the Sterry Method, I’ll bring you up to date.
In 1904, John Sterry announced a method for reducing print contrast by bathing the print in a solution of potassium dichromate after exposure and before development. This technique never had much of a following because it reduced paper speed substantially, drastically increased development time, and often caused fog and other problems. Potassium ferricyanide is an excellent contrastwise bleach for paper, while Mr. Sterry’s potassium dichromate bleach unfortunately, was not.
My New Sterry Method employs potassium ferricyanide rather than potassium dichromate. The new technique is vastly more effective and shares none of the drawbacks of the original Sterry Method. There is little or no speed loss, no increase in development time, and there are a number of remarkable added benefits.
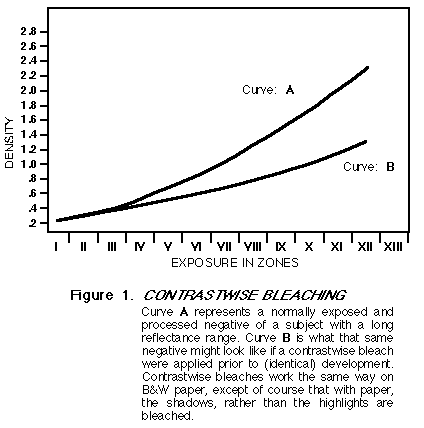
The New Sterry Method (and most SLIMT’s) works by bleaching the latent image prior to development. The bleach has preferential action on areas of greatest exposure, producing what is referred to as “contrastwise bleaching.” (See Figure 1.)
Maximum speed loss to date among all the papers I’ve tested is about one stop, and then only in cases of extreme bleaching. Between grades, bleaching generally requires no more than a 10% to 30% maximum exposure increase.
At the time I published my original Selective Latent Image Manipulation article in the May/June issue of Darkroom & Creative Camera Techniques, I had only tried the New Sterry Method on Kodabromide paper. Even this trial was cursory because I was much more interested in what SLIMT’s could do for B&W films, and for color materials. It is also no secret that I prefer using modern premium variable contrast papers and therefore didn’t (initially) have a lot of interest in SLIMT contrast control for graded papers. So it took me a while to think about exploring the use of SLIMT’s with graded papers. When I did get to it, I expected to find a moderately interesting technique that would on rare occasion be useful to a handful of photographers confronted by particularly contrasty negatives. To my surprise, I found a very great deal more.
What I found was a variable contrast system for graded papers that is remarkably effective, very simple, and can produce startling results unavailable through any other approach.
With the New Sterry Method you can achieve any contrast grade (or subtle fraction thereof) from the paper’s built-in contrast grade down to very low contrast, indeed. All this, from any paper you may choose to employ. In other words, a grade 4 paper can be made to yield any desired contrast, not just from grade 4 down to 3, but from grade 4 down to grade 00 or even 000. Grade 3 paper can yield any contrast from grade 3 down to the same 00 or 000, and so on for grades 2, 1, etc.
I’ve also learned that the New Sterry Method does much more than provide limitless and easy contrast variation between grades. In addition, it also offers a powerful new tool that makes printing some problem negatives much easier and provides a whole new way of manipulating contrast and tone. This extra benefit of the New Sterry Method comes about because of the unique way in which the method reduces contrast. I’ll elaborate.
The New Sterry Method (contrastwise bleaching) does not really change the paper’s built-in contrast in any way. A grade 4 paper bleached before development, whether bleached a little or a lot, is still exactly the same grade 4 paper. You see, contrastwise bleaching affects only the latent image deposited on that paper and not the paper itself. So when I refer to getting grade 1 or 2 contrast out of a grade 4 paper, what I am really talking about is the way in which the latent image is affected—not an effect on the paper grade itself. Rather than invent a new terminology, it is much more convenient (and familiar) to talk about paper grades than to devise a new vocabulary that more accurately describes what is really going on.
When you subject a print’s latent image to contrastwise bleaching, the areas of heaviest exposure (shadows) are bleached most, while the areas of minimal exposure (highlights) are bleached little (if any). The result of this combination of factors is that highlights print as (or nearly as) they normally would on the selected paper grade, even though overall contrast of the image is reduced markedly. For example, this allows you to get a different grade 1 performance out of each of grades 1, 2, 3, 4, etc., each in turn having higher and higher highlight contrast.
With one of the test negatives used for these investigations, I was able to get the equivalent of approximately a grade 1 print from a grade 4 paper with very high highlight contrast. I was surprised to see that the highlight contrast in this bleached print was much higher than that found in unbleached prints made from the same negative on grade 2 (or even grade 3) of the same paper type. In fact, local highlight contrast still was markedly higher even in a grade 4 print bleached back to the equivalent of grade 00 than it was in unbleached prints made on grade 2 or 3 papers. In my own case, this meant being able to get excellent prints from negatives previously classified either as unprintable or extremely difficult.
This can be a powerful tool in the hands of an experienced B&W printer. You can get double contrast control. For example, if you want grade 12 paper, you can get that contrast from papers of grade, 2, 3, 4, or even 5. Although all of these papers can produce the same exposure scale (overall contrast) after bleaching, each paper will produce a print substantially and usefully different from the others, in that highlight contrast will be progressively higher with each higher paper grade bleached to grade 12. The fine B&W printer can now choose the required highlight contrast and adjust the latent image to fit that particular grade of paper.
Applying the New Sterry Method
You need two items to use the New Sterry Method: one extra tray, and 100 grams of potassium ferricyanide.
Dissolve the 100g potassium ferricyanide in 800ml of water, then add water to make one liter. This 10% stock solution is enough to last quite a long time. When you’re setting up to print, mix 10ml of this stock solution with 990ml of water.footnote 1 The resulting solution is your Working Stock solution for the day’s printing. You will dilute this Working Stock even further to make final working solutions.
Contrastwise bleaches for the New Sterry Method generally require concentrations of about 0.001% to 0.01% or between 10 and 100 ml of Working Stock per liter of final working solution. The bleach concentration varies considerably with paper type, developer type, and the desired contrast reduction. You will have to run your own tests for your particular circumstances, but testing is very simple.
Final contrast is controlled by varying both the concentration of the bleach and the amount of time the print is in the bleach. I generally try to keep bleach times in a range of from 1 to 3 minutes. You will probably find times less than a minute are unwieldy, but there is no reason longer times cannot be used.
Although it has been my experience that bleach baths can occasionally be reused once or twice, I strongly advise against it. These baths are so dilute, it is extremely unlikely they will retain their full strength after one use, and any attempt to reuse them is false economy. Therefore, change baths after each print. It this seems wasteful, keep in mind that if you were to use an entire liter of 0.1% Working Stock, only 1 gram of potassium ferricyanide would go down the drain. Therefore, for all practical purposes, what you are really dumping after bleaching each print, is water.
Procedure
After exposure, immerse the print in the bleach tray, and agitate normally. When the predetermined bleach time is up, lift the print from the tray, drain, and transfer it directly to your developing tray. No rinse is necessary because the concentration of carried over bleach is miniscule. In addition, the bleach will also be either already exhausted or will quickly become so in the developer. To date, I have noted absolutely no change in developer activity caused by bleach carryover. However, should you experience these difficulties, adding a plain water rinse between bleach and developer would solve the problem. After bleaching, develop the print for your normal time and follow the subsequent steps (stop, fix, etc.) according to your normal procedures.
Before returning to the enlarger, dump your bleach tray and fill it with fresh bleach having the desired dilution. Rinsing the tray is unnecessary unless it becomes contaminated with some other solution or if you are going to change from a higher bleach concentration to a lower concentration.
Once you have settled on an approximate percent bleach concentration, you may find that thinking in terms of milliliters of working stock solution per liter of bleach bath is simpler than thinking in terms of percentages. For extremely subtle contrast reductions, it may even be necessary to create a higher dilution Working Stock from your already existing Working Stock solution. For example, when dilutions from your Working Stock require less than 5ml increments, diluting your Working Stock will provide greater accuracy and make things a little easier. Likewise, if you have to use overly large volumes of working stock, mix a higher concentration of working stock solution.
Fog
To date I have found no B&W papers that fog when using this technique. However, should yours do so, the solution is extremely simple. Keep on hand a liter of 10% stock solution of potassium bromide. When making up your Working Stock, add potassium bromide equal to one-third the amount of potassium ferricyanide.footnote 2 In other words, if you use 10ml of potassium ferricyanide, also use 3 to 4 ml of 10% potassium bromide solution (the amount is not critical). Should fog occur, it will be substantial. You needn’t worry about looking for small amounts of fog.
Paper Differences
All papers listed in Table I were generously provided by their manufacturers. In terms of producing an overall contrast reduction, the New Sterry Method works equally well on all of these papers. I have tested such a broad range of very different papers that I feel it is safe to conclude that the New Sterry Method will work on any B&W paper.
Subtle between–grades contrast control was equally as effective across the board with all of the papers tested. Therefore the reader can feel confident that this technique will provide excellent between–grades contrast control with whatever paper is chosen.
There were some notable differences between paper types when it came to extreme bleaching across grades. All papers, regardless of type or grade, could be bleached back to any desired lower grade or fraction thereof. However, some papers performed better than others at retaining higher highlight contrast when high grades were bleached back to much lower contrast, such as grade 0 or grade 1.