Advanced Zone System Filter Use (Parts I&II)
Part I: A New Approach to Filter Factors
©Copyright 1993 thru 2008 David Kachel
Article First Appeared in Darkroom & Creative Camera Techniques in July/Aug 1993
Filters are at once wonderful, and infuriating! In other articles I have described filters as both an indispensable tool that greatly expands one’s options for contrast and tone control; and as the greatest monkey wrench in the works of Zone System photography, irrevocably dashing any hopes for precise calibration and control.
In this series I will forego a review of the basics of filters, assuming you are already familiar with them. However, for those who may need a refresher, I cannot recommend any better introduction to filters than that contained in Ansel Adams‘ first series of books, Basic Photo Four, Natural Light Photography, and to a lesser degree, in his more recent series, The New Ansel Adams Photography Series, Book Two, The Negative. Another very helpful book to have on hand is Kodak’s publication #F-5, Kodak Filters for Scientific and Technical Uses. This last book provides detailed spectral transmission characteristics for all of the Kodak Wratten filters likely to be used in B&W photography. Having this information is very helpful indeed. Naturally, the spectral information applies only to Wratten filters, so you may need another resource if you use filters, made by another manufacturer.
There is perhaps no other area of B&W photographic practice about which we know so little, as the use of filters. I for one, certainly cannot claim to have all the answers—or even all the questions. Nonetheless, I do have some new information and techniques, and some little known older information to share. There is also at least one rather startling surprise.
It has always seemed peculiarly ironic to me that we who use the Zone System, after expending so much time and effort avoiding the average approach to exposure, development, and printing, should immediately embrace it the moment we place a filter in the light path. But that is exactly what we do when we apply filter factors in the traditional manner.
In the Zone System we are taught to base exposure on shadows. But when we apply a filter and its conventional filter factor, we abandon this concept, and instead base our exposure on a midtone. You see, a filter factor indicates the amount of additional exposure required to make a middle gray produce the same negative density with a filter as without—ignoring the shadows.
Although filter factors are based on reproducing a neutral-colored middle gray tone (such as a gray card), shadows are not inherently neutral in color. Most photographers would agree that exterior shadows are rather blue, illuminated largely by blue light from the open sky. Filters that pass blue light (blue, cyan, and magenta) will lighten shadows compared to a middle gray tone. Naturally, filters that block blue light (yellow, green, and red) will darken shadows, compared to a middle gray. Therefore, when we apply a filter factor exposure correction, we are correcting for a sunlight and skylight illuminated midtone and allowing shadows to be pushed above or below their original exposure placement. This happens because a filter will either increase or decrease the percentage of blue light arriving from the shadow areas, compared to a middle gray.
Filter factors are based on a determination of the exposure increase needed to maintain the same negative density for a gray card (Zone V), illuminated by a mixture of sunlight and skylight (approximately 5500°K).
In the Zone System we rarely base exposure on such a tone, but rather on a shadow tone, often illuminated by blue skylight alone. Therefore, it would make more sense to determine filter factors based on a gray card in shadow and on Zone III, rather than in sunlight and on Zone V. This would automatically compensate for the previously mentioned influence of different filters on the exposure of blue illuminated shadows. Such an approach would also allow us to maintain the integrity of our shadow–based Zone System exposure determinations—even when employing filters that can potentially alter shadow density.
My technique is very simple. Set up a gray card in a shadowed area similar to that found in the type of subject matter you customarily shoot. Expose a control negative (no filter), placing the gray card on Zone III. Then for each filter you employ, bracket a number of test exposures starting with the manufacturer’s recommended filter factor. Process all negatives for any given filter together with their no-filter control negative. The filtered gray card negative that most closely matches the control will give you your factor. (Don’t be cheap. Use a Kodak gray card—others may have a color bias.) You must use a gray card for this, because any natural subject could dramatically alter your test results—especially if it has any color bias at all. You should expect some of your results to differ significantly from standard filter factors.
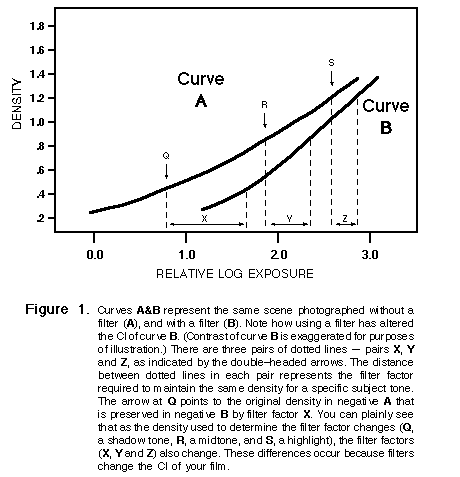
Now, because not all Zone System shadows are actually in shade, repeat this test with the gray card in direct sunlight. Once again, place the card on Zone III, not V. You will get different factors from those found in the shaded gray card tests, and also different from standard factor tests that generally place the gray card on Zone V, rather than III. The reason for these differences becomes apparent if you study Figure 1. Here we can see that the factor changes depending on which Zone we place the gray card, because filters also change the final Contrast Index of the negative. (For more information on film contrast changes, see Part II.)
Determining filter factors by the shadow-based method allows us to remain consistent in our Zone System practice, basing exposure on shadow placement (Zone III) even when employing filters, and reducing the under and overexposure problems frequently caused by filter use. Unfortunately, even this is not an ideal solution because filters are not so easily tamed.
Despite the effectiveness of this shadow-based approach to filter factor determination, it is still necessary to bracket filtered exposures (especially when using strong filters) 2 to 1 stop. The reason for this is twofold:
Unfortunately, the two examples I just cited are not the only instances of adverse influence on filter factors and exposure.
Color is a substantial influence in B&W photography, perhaps more than in color photography. And the effect that a filter will have depends very much on the colors and color sensitivities involved in every step of the process.
I mentioned earlier that the color of an object in shadow can affect the Zone III shadow-based factor of the filter being used at the time. But the color
of the object metered can also adversely affect the accuracy of the meter reading itself, whether a filter is to be employed or not.
The spotmeter I own and use is overly reactive to the colors yellow and orange, and recommends insufficient exposure when these colors are metered. It is less than adequately sensitive to indigo and purple, and recommends overexposure of these colors. Green will meter approximately correctly.
All exposure meters have disproportionate reactions to different colors and will mislead us when highly saturated colors are metered for exposure purposes. Fortunately, colors in nature are seldom very pure, lessening this effect most of the time. However, it is a good idea to meter areas as neutral as possible. This way we can avoid the possibility that our meter’s disproportionate readings of different colors might compound the difficulties caused by applying gray card derived filter factors.
If photographing man-made, saturated colors, metering a gray card or other substitute might be a very good idea.
Filter factors are also influenced by your film’s color sensitivity. For example, films with extended red sensitivity would need a much lower factor for red, yellow, and magenta filters. Each type of film has different color sensitivities and therefore requires its own set of factors.
Reciprocity failure also plays a role, causing filter factor changes with longer exposures.
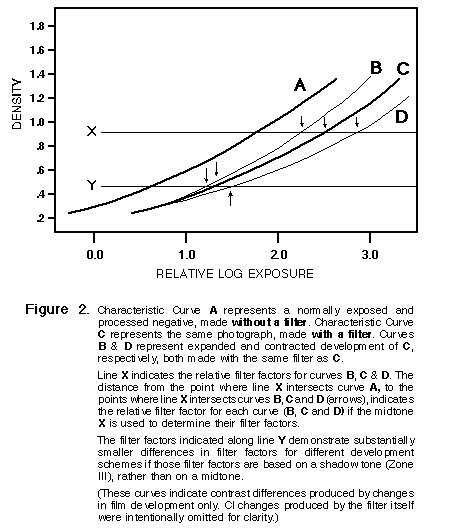
One of the most important influences on filter factors is something we do in the Zone System all the time: intentionally altering film development. Using the traditional approach to deriving filter factors (i.e., gray card tests in sunlight on Zone V), we can see that N+ and N- development would significantly alter the correct filter factor for each development scheme (Figure 2). Fortunately the new method I proposed earlier in this article minimizes this effect by placing the gray card on Zone III instead of V. Since the lower Zones are less affected by development changes, our Zone III-based factors will also be less affected. However, there will still be some degree of change.
There are three different ways in which filters affect contrast and tone. The first way is by changing local tones, the second by changing the Contrast Index (CI) of the film, and the third by changing the density range of the negative (different from CI) by producing an effective change in the reflectance range of the subject.
The newcomer to filter use is usually attracted by the fact that blue skies can be made darker by employing a yellow or red filter, or by the tired old saw about separating red flowers from green leaves. Although very useful, these commonly cited local tone changes hardly represent the full potential of local tone controls available with filters.
Local tones can be manipulated with filters any time there is a difference in local color or in local illumination.
Differences in local color allow us to employ a filter that passes one color and blocks the other. The example of red flowers against green leaves illustrates this quite well. However, there are more subtle variations of local tone change available to us than the foregoing example suggests.
Colors in nature are neither pure nor uniform and this fact allows a great deal of latitude with certain subjects. To take advantage of these facts you must carefully observe and analyze the subject and have a thorough understanding of the characteristics of the filters you employ. A few examples may help illustrate the potential for creative opportunities.
From time to time, I use a #11 (yellow-green) filter to separate red tones. (I actually prefer the #13, but Kodak has discontinued this filter.) I recall discovering a sand bar running along a river in the Andes of southern Peru that had beautiful patterns in the sand. Some portions of the bar had a slightly darker, more reddish color than the adjacent lighter and more yellow sand. The differences in tone and color between the two were very slight and couldn’t possibly have shown a significant tonal difference in a photograph made without a filter. Neither would a red or yellow filter have been of any help because they both would have passed virtually all the yellow and red light involved.
However, the yellow-green Wratten #11 filter passes some red (closer to the yellow end of the red spectrum) and blocks some red (closer to the opposite end). Employing this filter produced a pleasing separation in the tones of the sand bar, despite the fact that it was essentially all the same color. It achieved this remarkable effect by cutting light near one end of the red spectrum and passing red light that was closer to the other end. This produced beautiful separation between the subtle patterns in the sand. (Although this technique worked very well, the photograph was largely a bomb in every other respect; my clever filter use being insufficient to save the image from other inadequacies caused by the same clever fellow!)
Foliage offers a wonderful example for illustrating the subtle local tone changes possible with filters when there are variations in local color.
Leaves (excluding the obvious differences found in deciduous fall changes) offer a wide variety of colors, both from one type of leaf to the next and within the same leaf! Although appearing to be largely green, leaves can have a decided yellow or even blue reflectance, and though not visually apparent, frequently reflect a great deal of red light. (This little know factor, also called the Wood Effect, means that due to the high red reflectance of foliage, red filters employed to block green light and therefore darken leaves will not be nearly as effective as one might think. Often a blue filter will do the job better, because it will block both the green and red light, eliminating the Wood Effect.)
A magenta filter (I use the Kodak Wratten #32) can be used to differentiate the subtle color differences in yellow green leaves, lightening the portions that tend more towards yellow and darkening those that tend toward green. The same filter will work with blue-green leaves to lighten the more blue portions and darken the greens.
You might think that a yellow filter would be useful with green leaves having yellow spots or striations. However, if we examine the spectral transmission of yellow filters (the Wratten #8 for example), we can see that this filter transmits green light just as readily as yellow and red, and therefore would have no effect at all. This points out the importance of being familiar with the spectral transmission characteristics of the filters you use, in addition to exercising careful analysis of the color subtleties of your subject.
Please bear in mind that the foregoing examples are not intended as suggestions of what to do under given circumstances. They are intended as demonstrations of the type of analysis and manipulation that can be pursued with different subjects. Each subject presents different possibilities that a photographer must evaluate individually, and then devise a filtration approach to fit the circumstances. Sometimes the solution will work and other times it will not. Experimentation with different filters (and ideas!) is highly recommended.
Using filters to manipulate local tones when there are differences in local illumination is another valuable tool. This possibility exists any time the same subject is illuminated both by sunlight and skylight.
A side-lit textured red wall in sunlight is a good example. The small shadows cast by the wall’s texture can be deepened by any filter that blocks blue light and lightened by any filter passing it. However there are different ways to approach this common situation.
If we wish to reduce local tonal differences we can do so by employing a blue filter to lighten the textural shadows and darken the red wall overall. A cyan filter would also lighten the shadows and reduce the amount of red light reaching the film. Each filter would do this to a different, and largely unpredictable degree. It is necessary to try both to see which gave the best result.
We are presented with similar options if we wish to increase the local tonal differences of the wall. Either a yellow or red filter would increase the effect on the film of the sunlit portion of the red wall, while reducing blue light from the textural shadows—once again to different degrees.
A green filter would cut light from the blue-illuminated shadows while also reducing red transmission. This would decrease local tonal differences if the reduction in red transmission were great enough and increase them if it were not. The only way to be sure would be to try it to find out.
Finally, we could use a magenta filter to lighten both the small shadows and the red of the wall.
As you can see, the effects of different filters on local tonal variations—both through manipulating color differences and by taking advantage of differences in illumination—are quite varied and rich in possibilities. They are also frequently not very obvious and require some careful thought. Furthermore, they are not very predictable. What worked for me on a sand bar in Peru may not work for you on a sand bar in Minnesota.
In addition to careful thought and analysis, experimenting with different filters on the same subject is a very good idea. The day you get a wonderful tonal quality using the blue filter you were sure would be disastrous, you’ll see what I mean.
In the concluding second article in this series, I discuss filtration-induced contrast and density range changes, and provide some overall strategies you may find helpful.
©Copyright 1993 thru 2008 David Kachel
Article First Appeared in Darkroom & Creative Camera Techniques in Sept/Oct 1993
In Part I , I introduced my new filter factor method and some other concepts about filter effects. In this concluding article, I’ll look a bit more at the unusual effects of filters on your film.
Everyone knows about tone changes with filters. After all, that is largely why we use them. We’d like to see some colors rendered as lighter and others as darker grays—and we’d like to see more separation in adjacent areas of different color but similar tone.
What is not widely known is that filters also affect the actual contrast (Contrast Index) of the film itself, regardless of the color of the object(s) photographed.
A number of authors (including Ansel Adams) have stated that red (Wratten #25 or #29) filters will produce a higher CI than normal, while blue (#47 or #47B) filters will produce a CI lower than normal, and that green (#58 or #61) will produce an approximately normal CI.
To be more specific, if you were to expose four pieces of the same film to the same stepwedge, one with no filter, and each of the others through red, green, and blue filters in turn, then develop all four pieces of film together at your normal processing time, the non-filter and green filter scales would be similar, while the blue filter scale would have a significantly lower than normal CI (about equal to N-1), and the red filter scale would have a substantially higher than normal CI (about N+1). I repeat: these are actual changes in the Contrast Index of the film and are not due to other causes such as subject color or illumination. The end result of these CI changes is exactly the same as if you were to expand or contract development of your film.
While doing my research on filters, I realized that this idea concerning CI changes with different filters has been repeated by many, including myself, and that I had never personally done any tests to see if it were actually true. Neither was I aware of anyone else having done such tests. So I decided to test two films to see whether or not there was any validity to these claims. I chose Tri-X Pan and T-Max 400 because they are excellent representative samples of old and new film technology.
The Tri-X Pan performed exactly as reported. Red filtration (#29) produced about an N+1 increase in CI while a blue filter (47B) produced about an N-1. Green (#61) was similar to the no filter control negative. Less strong filters would of course produce lesser changes in CI. I feel it is safe to include these contrast changes into my N number calculations when working in the field with filters and traditional B&W films.
The real shock came from my tests on T-Max 400. This film also exhibited contrast (CI) changes with different filters, but the changes were completely different from anything I might have predicted.
Using a #29 red filter with T-Max 400 produced an enormous drop in CI, equivalent to about an N-2 contraction — the opposite effect the same red filter has on traditional B&W films. Just as surprising, green (#61) and blue (#47B) filters produced substantial increases in CI, both about an N+1 expansion.
I made inquiries at Kodak about these peculiar findings and they are consistent with Kodak’s observations. I have also included these filter-related contrast changes into my N number calculations in the field.
I have no idea why these effects take place. Previous theories that red light penetrates further into the emulsion thereby causing more exposure and a contrast increase with older films seem feeble in light of the results shown above with T-Max 400. I have several hypotheses of my own, but absolutely no evidence to support them. I am certain only that the Contrast Index changes reported with different colored filters are real, very significant, and enormously different between traditional films and T-grain films. I strongly urge you to consider including these differences in your own calculations.
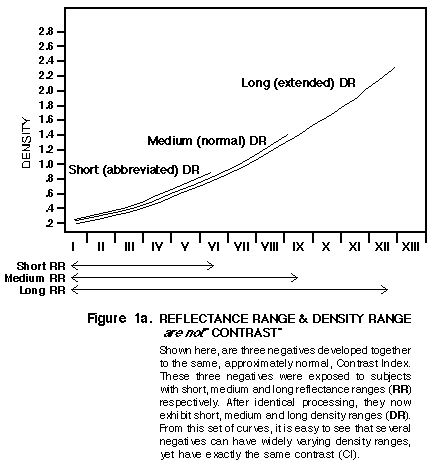
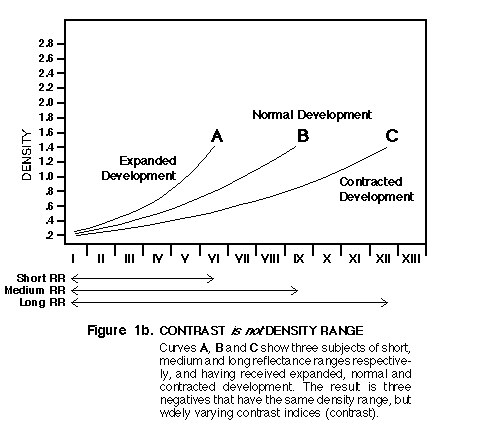
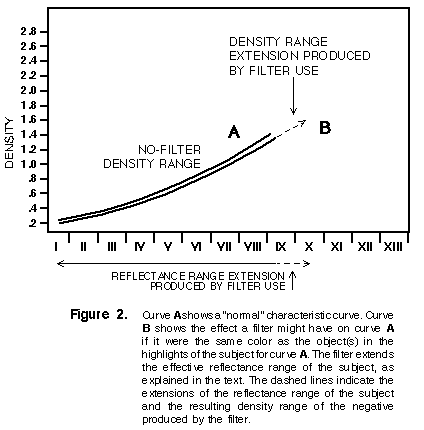
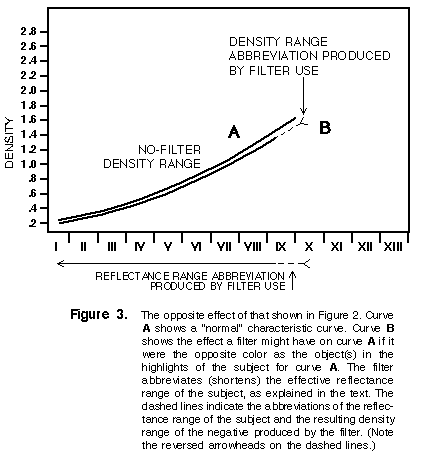
In order to follow this discussion it’s extremely important to understand that I make a distinction between a change in contrast (Contrast Index) and a change in density range. The latter is often mislabeled as a contrast change. Density range and Contrast Index have nothing in common, though they are frequently called the same thing. A look at Figure 1a will help to differentiate between contrast and density range. It can easily be seen from this set of curves that several negatives can have exactly the same Contrast Index (contrast) while at the same time having widely varying density ranges. Figure 1b shows three curves having identical density ranges but substantially different contrast indices (CI). Although we commonly refer to a long density range negative as having high contrast and a short density range negative as having low contrast, this is absolutely incorrect. To differentiate between the two, I like to refer to an increase in density range without a change in contrast as an “extension” of the density range. I call a decrease in density range without a change in contrast an “abbreviation” of the density range. I also speak of N+ “extensions” and N- “abbreviations” of density range.
In addition to the local tone changes discussed in Part I, and the overall CI changes mentioned above, you can also use a filter to cause density range extensions and abbreviations.
This is the simple result of the fact that filters will pass more light of some colors than others. Let’s use the Wratten #8 (K2 in older terminology) filter as an example.
This filter passes about 88% of the yellow light incident to it, without any increase in exposure (filter factor) required. However, imagine that you have a Zone III shadow that requires a one-stop exposure increase when using this filter to maintain the same shadow density. This means that a yellow object that fell on Zone VII before using a yellow filter will have its exposure doubled by one stop and will therefore contribute twice 88% (or 176% exposure) to the negative—when photographed through a yellow filter with a 2x factor applied. This will produce the equivalent of an N+1 negative density range extension (see Figure 2), moving the yellow tone from Zone VII to Zone VIII. However, it will not produce expansion of the negative by increasing contrast. It will only lengthen the effective reflectance range of the subject, and therefore the density range of the negative. The more saturated the subject and the stronger the filter, the more pronounced this effect will be.
You can achieve the same effect in reverse using filters that reduce light from colored object in higher Zones. Using the same example as above, we could instead employ a blue filter. A Wratten #47 blue filter passes virtually no yellow light and about 49% of the blue light incident to it. After applying a filter factor of say, 6x to keep our shadows on Zone III, the amount of yellow light passing through the filter will not have changed because the filter does not pass yellow light. This effectively moves the yellow object down the exposure scale, shortening the subject reflectance range and also the resultant negative density range (see Figure 3). This will produce an abbreviated density range, but not a change in CI. (This does not include the CI changes described in the previous section by using a strong blue filter.)
At this point I must mention that colors in nature are not at all pure —making filter-produced negative density range changes highly unpredictable at best. However, there will always be some extension or abbreviation of the density range unless higher tones are neutral gray. The only way to deal with these changes is to process only one negative of each subject, then adjust the processing of the remaining negatives based on the results.
I include this section largely because the literature is so loaded with suggestions to meter through your filters. Attempts to bypass the unpredictability of filters by metering through them can lead only to dismal failure.
I did extensive tests using T-Max 100, T-Max 400, Professional Copy Film Type 4125 (see "Zone System Expansion Film") and new filters (Wratten Filter Numbers 8, 11, 12, 15, 21, 25, 29, 58, 61, 47, 47B, 32, and 44), all kindly provided by the Eastman Kodak Company for this and other investigations related to this article. I wanted to see what the differences were between exposures determined by metering through a filter and the correct exposure compensation determined by bracketing around a filter factor. Results are shocking.
The smallest differences for mild filters such as a #8 were 3 to q stops, while the differences for stronger filters were as much as 3 stops. In no case was the exposure metered through the filter anywhere near correct!
Then, I did tests to determine if there might be a constant difference between readings taken of shadow tones through a filter and the factor actually required for that filter. If such a consistent difference existed, this would allow me to meter through a filter, apply a known correction to that result, and get predictable performance — No such luck! As the color of the object being metered changed, so did the difference between filtered meter readings and the actual factor required. Such a method would work only if your subject is always neutral gray and always illuminated by light of the same color temperature — nor very likely!
As fault-ridden as it is, the filter factor method is still the best way to determine correct exposure with a filter. This is especially true for the shadow-based method I described earlier in this article.
My personal choice for filters is Wratten Gelatin Filters from Eastman Kodak. My experience with Wratten filters is that they have extremely high quality and consistency. I can’t say the same thing for other brands and types of filters.
Gelatin filters are sufficiently thin that they do not significantly interfere with light transmission, nor do they produce flare. They also do not add any additional air–glass surfaces to the light path. This is very important to maximum optical performance. Although I can’t speak for all brands, in my experience gelatin filters have been superior to other types I’ve used. In addition, Kodak provides precise data on the spectral and dye fading characteristics of all their filters, which is very important information to have.
A dozen gelatin filters also weigh a lot less and take up a lot less space than a similar quantity of glass or plastic filters, and are more cost effective because their one–size–fits–all nature eliminates the necessity of having a different complete set of filters for every lens.
Finally, one manufacturer’s red (or any other color) is not the same as another’s and may not even be the same from one production run to the next. Although they may appear similar to the eye, there are often substantial differences from one filter brand to the next that will become apparent only in the final negative. There are no agreed upon standards for filters. This means that the only way to be certain you are getting the spectral characteristics you think you’re getting is to stick with a known quantity, i.e. Kodak Wratten filters. I tend to think of off-brand filters in the same way I do of off-brand films: Thanks, but no thanks!
There is no doubt about it. Filters take the nice neat little package of predictability and control we thought we had with the Zone System and blow its contents into next week.
The only way to deal with this problem is to either refuse to use filters, a head–in–the–sand approach that denies us an extremely useful tool and doesn’t really make the Zone System much more predictable anyway (for a spirited defense of this statement, see "Zone System Calibration"), or to bite the bullet and accept the fact that the Zone System is not precise and doesn’t need to be. Since the benefits of filter use far outweigh the annoyance of increased uncertainty, I suggest the latter approach.
When applying any filter, to any subject, under any lighting condition, we can be assured that certain general effects will occur.
First, because filters either pass a color or block it, virtually all tones in the subject will be changed to a greater or lesser degree by employing any filter at all. Even neutral gray objects are changed in tone—because filters also produce changes in CI. In theory, when a filter is used the only tone that is not changed is that one tone upon which the factor was based. But as we saw previously, even this is not guaranteed.
Second, if there is a colored object in the upper subject Zones, employing a filter will produce either an extension (if the filter passes that color) or an abbreviation (if the filter blocks that color) of the effective reflectance range of that subject, and therefore of the density range of the negative. These changes in density range can vary from insignificant to severe, depending on the circumstances and the filter employed.
Lastly, most filters will produce a change in the Contrast Index of the film, independent of any other factors. Weak filters may produce a barely noticeable change, while stronger filters often produce a very substantial change.
Therefore, when we apply any filter at all, we know that virtually all of the subject tones will be changed. We know that the negative density range will likely be altered, and we know that the final Contrast Index of the negative will also be affected. What we do not know in any of these cases is — by how much?
We can know what a filter is likely to do based on our analysis of the subject, knowledge of the filter’s spectral characteristics, experience with that filter, and our own familiarity with the film we use. However, we can never be certain the filter will perform as expected or to the degree expected.
The only way to effectively circumnavigate this near complete unpredictability is to first, bracket exposures ±2 to 1 stop when using filters, as previously mentioned, and second, avoid processing all the film from one subject at the same time.
The way I approach this, to save time, is to process 5 or 6 negatives together, each from different subjects. This way my time in the darkroom usually isn’t lengthened, yet I still process only one sheet of film from any given subject at a time. It also helps minimize the effect of darkroom accidents should they occur.
If we process only one negative of a subject and have kept careful notes in the field, it is easy to adjust development of the remaining negatives of that subject based on the result obtained from the first. If not using sheetfilm, one simply has to surrender to chance and guess at an appropriate processing time for an entire roll.
I also find it extremely advantageous (make that, — essential), subject and time permitting, to shoot one sheet of film without a filter so I will have a straight negative for comparison. This allows me to know exactly what effect the filter(s) really had, and points out any exposure, contrast, or tonal differences that may have resulted from subject analysis errors on my part, rather than something the filter did. This is a very helpful tool whether one is just starting to use filters or has used them for years. I strongly recommend it.
Effective filter use comes only with experience, lots of experimentation, and careful preparation for the unexpected. Filters force us to accept the unpredictable and imprecise nature of the Zone System and photography in general, while offering us a dramatic increase in the number of options available to us for tone and contrast control.
For me, accidentally leaving my filters at home is just as big a disaster as leaving my film holders. I immediately turn the car around (this has actually happened) as they are an integral and completely necessary part of the way I work. They also drive me absolutely nuts.—I hope they will do for you what they have done for me.
David Kachel